 CourseGlade
 Create your first course
Build a course end to end — details, curriculum, lessons, a quiz, pricing, and publishing — with exact screens.
This walks the real editor, screen by screen, from an empty course to a published one.
1. Start a new course
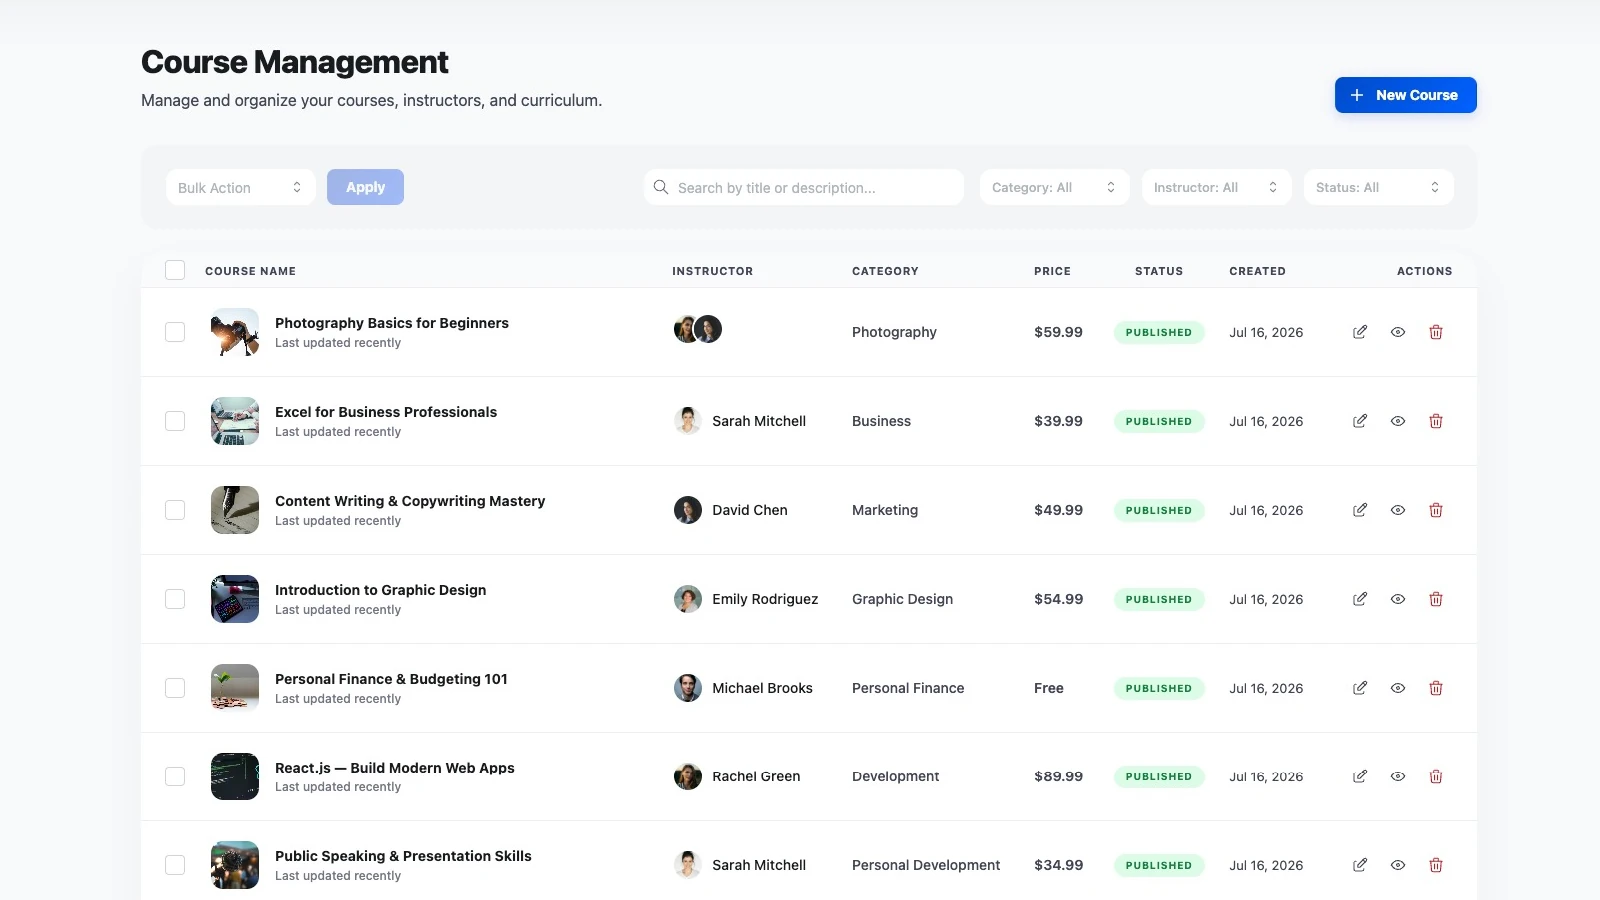
In wp-admin, open CourseGlade → Courses, then click New Course (top-right). You land in the course editor on the General tab.
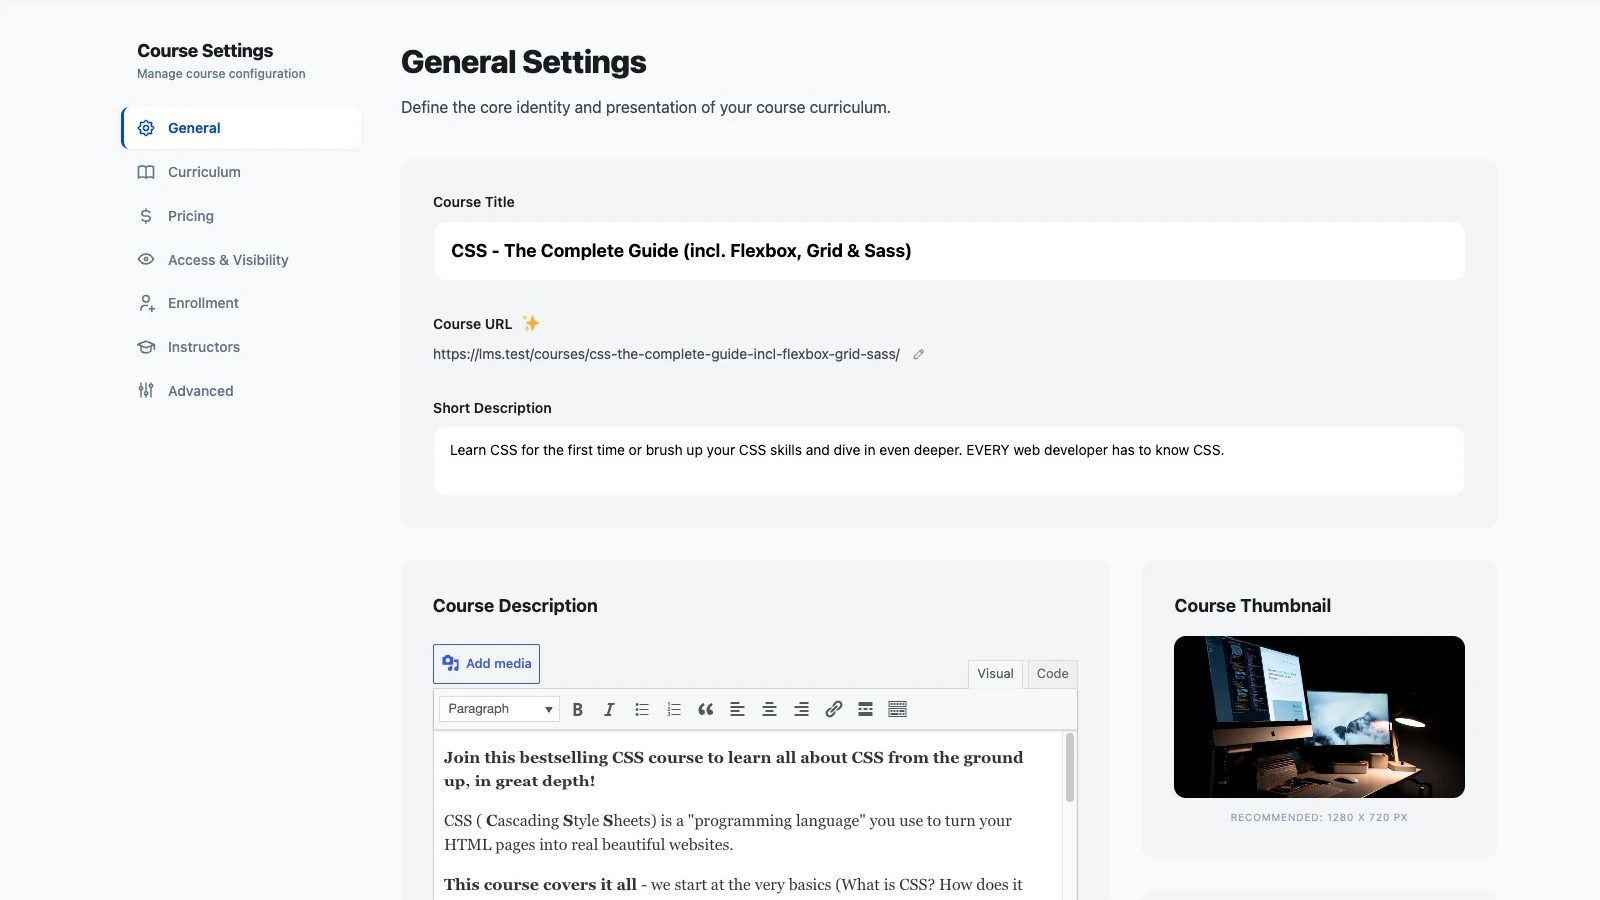
The editor has seven tabs down the side: General, Curriculum, Pricing, Access & Visibility, Enrollment, Instructors, and Advanced.
2. Fill in the General tab
- Course Title (required) — e.g. “Masterclass in Advanced Typography”
- Course URL Slug — the page URL (auto-filled from the title)
- Short Description — the catalog blurb
- Course Description — the full rich-text description
- Sidebar cards: Thumbnail, Intro Video, Duration, Difficulty, Categories, Tags
Set the status in the top bar (Draft, Published, Pending Review, or Private) and click Save.
Save before building the curriculum. The Curriculum tab is locked until the course is saved — until then it shows “Save the course first to start building your curriculum.”
3. Build the curriculum
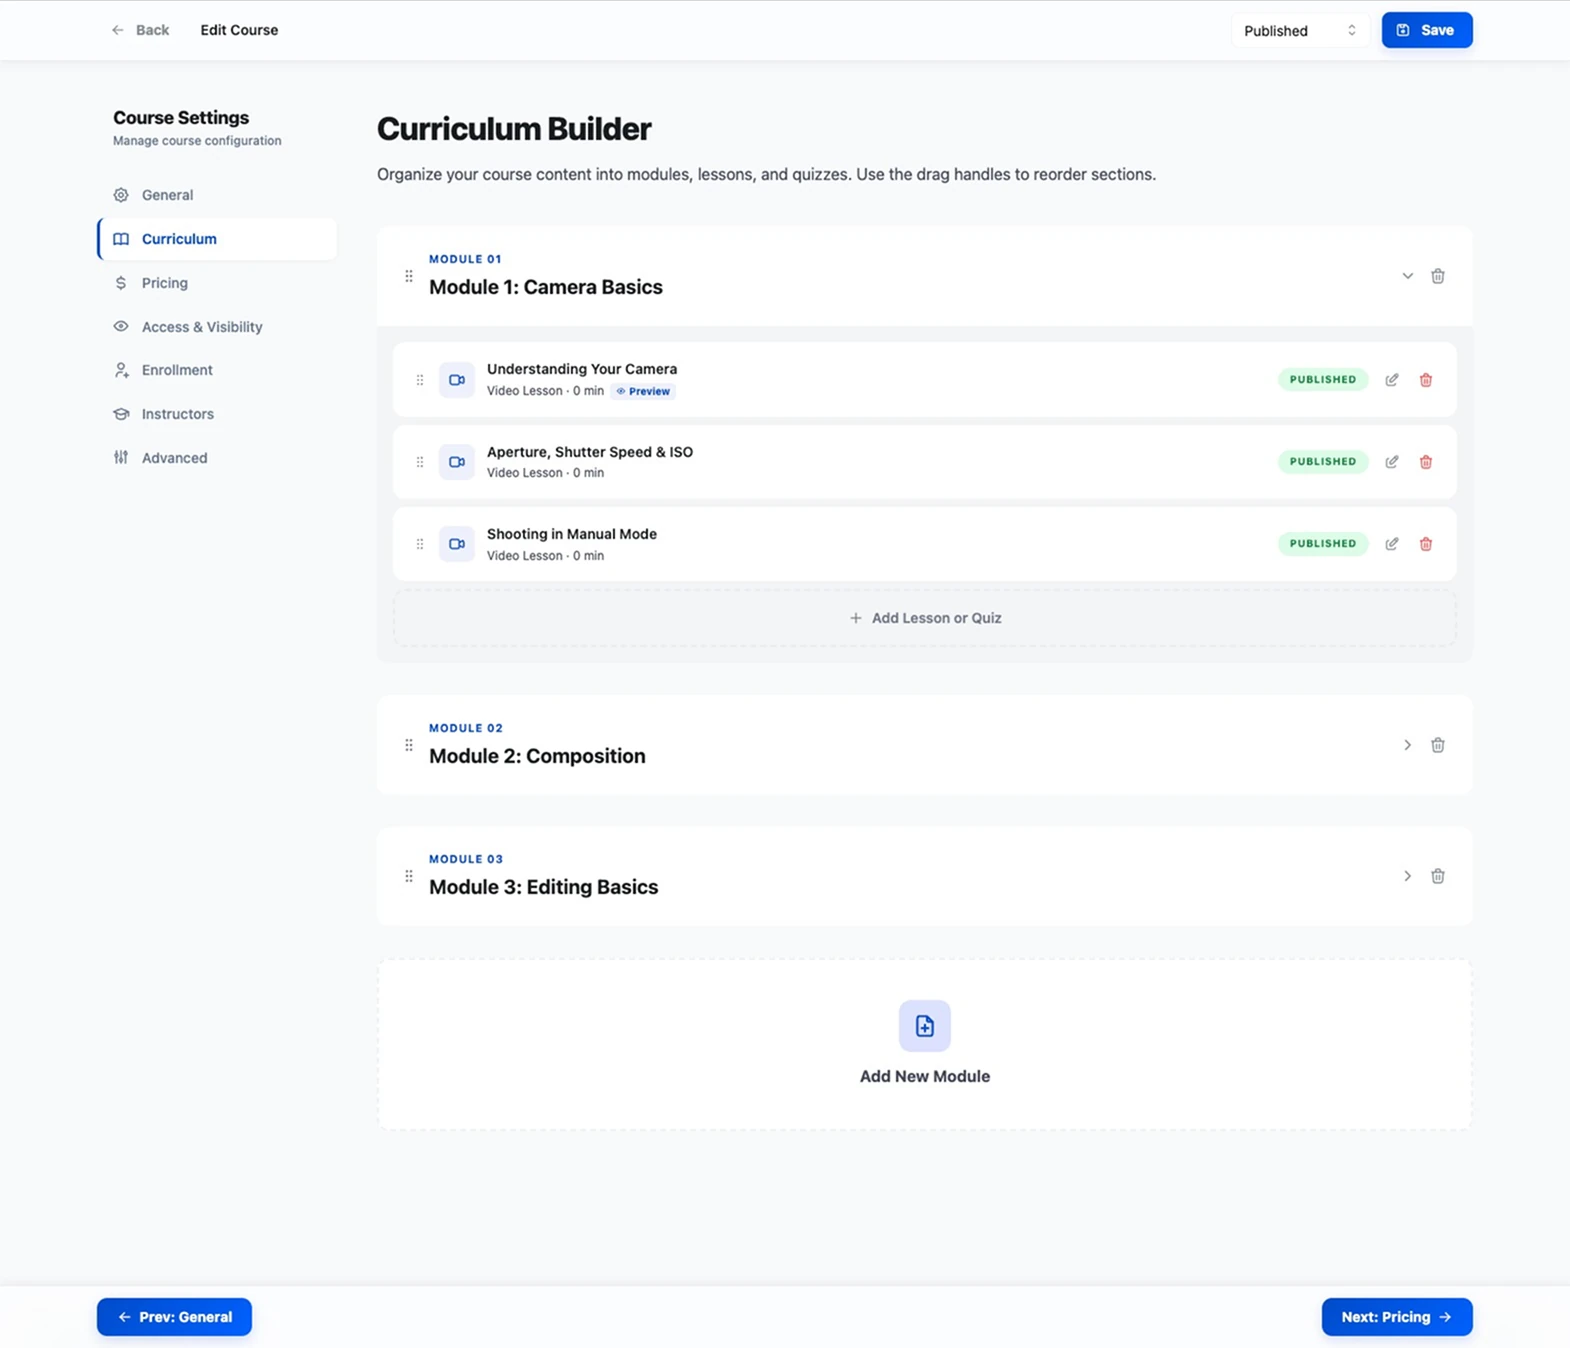
Open the Curriculum tab. Content is organized into modules (sections), each holding lessons and quizzes.
- Click Add First Module, enter a Module Title (e.g. “Module 1: Introduction”), and click Add Module.
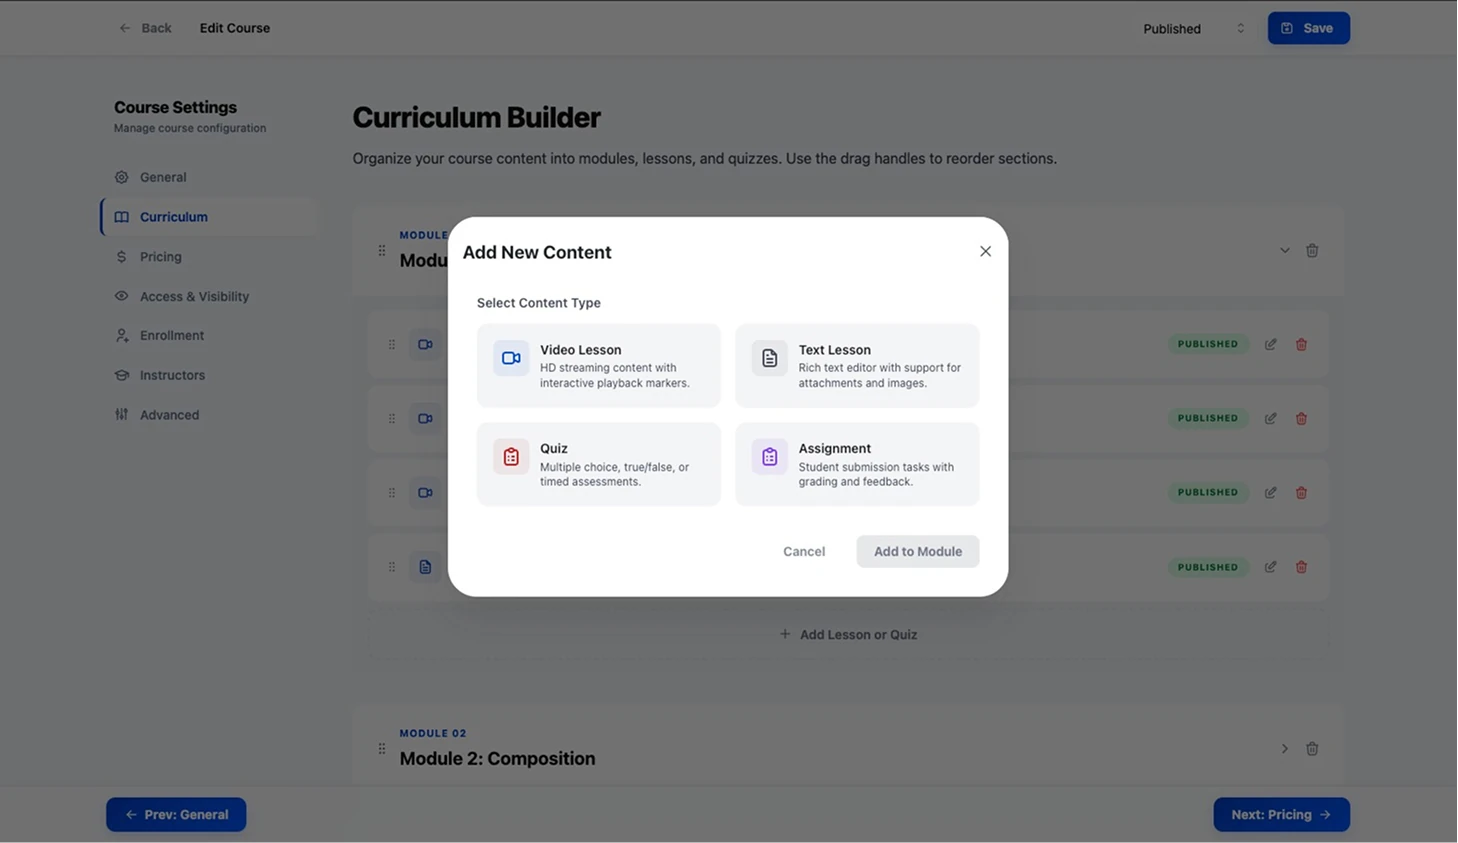
- Inside the module, click Start building (or Add Lesson or Quiz) to open the Add New Content dialog.
- Under Select Content Type, choose:
- Video Lesson
- Text Lesson
- Quiz
- Assignment — needs the Pro Assignments addon; the option is visible but disabled until it’s active
- Click Add to Module.
Reorder modules and items any time by dragging the grip handles — including moving an item into a different module. Add more sections with Add New Module.
4. Add a video lesson
In the Video Lesson Editor:
- Lesson Title (required)
- Estimated Study Time, Status (Draft/Published), Description
- Video Source — pick Upload File, YouTube/Vimeo, or External URL. For YouTube/Vimeo, paste the URL; for uploads, drop an MP4/WebM/MOV (up to 500MB).
- Lesson Settings toggles — Allow Preview (watch without enrolling), Make Mandatory (must finish to progress), Enable Comments (Q&A below the video)
- Attachments — attach downloadable files
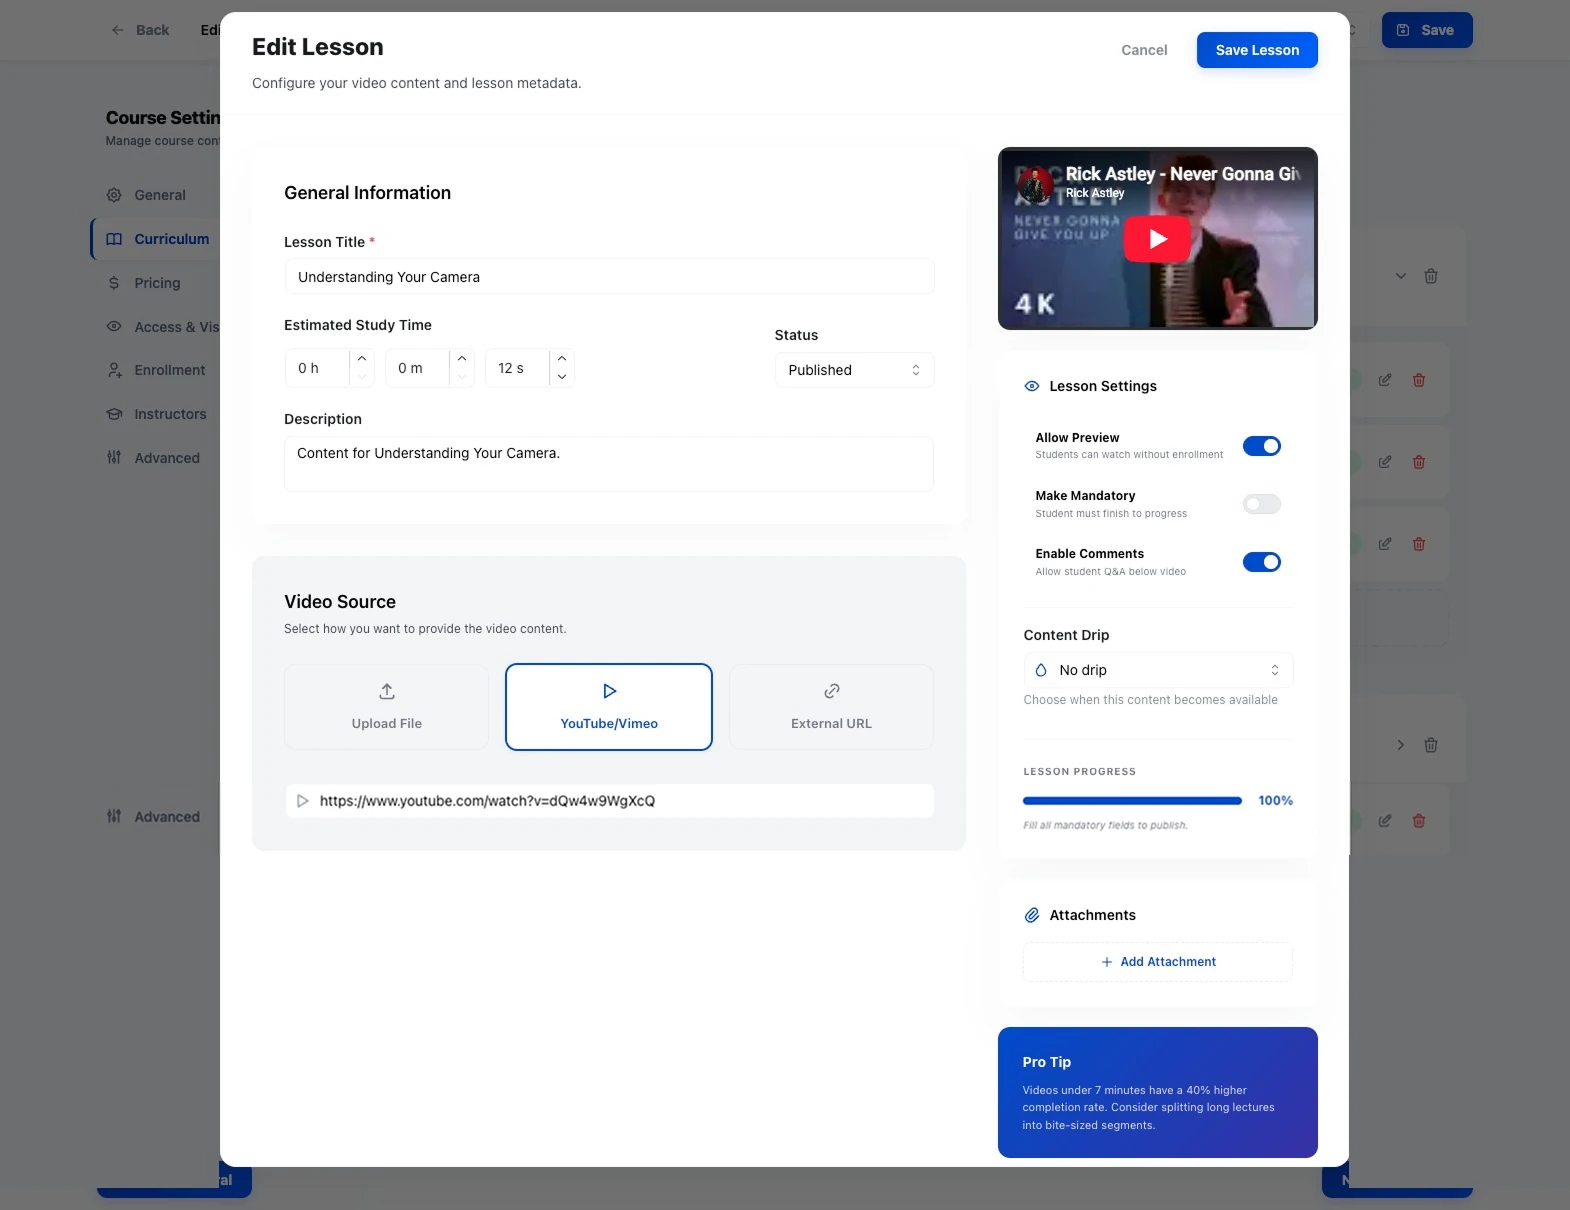
Click Save Lesson. A Text Lesson works the same way with a rich-text Lesson Content field instead of video.
5. Add a quiz
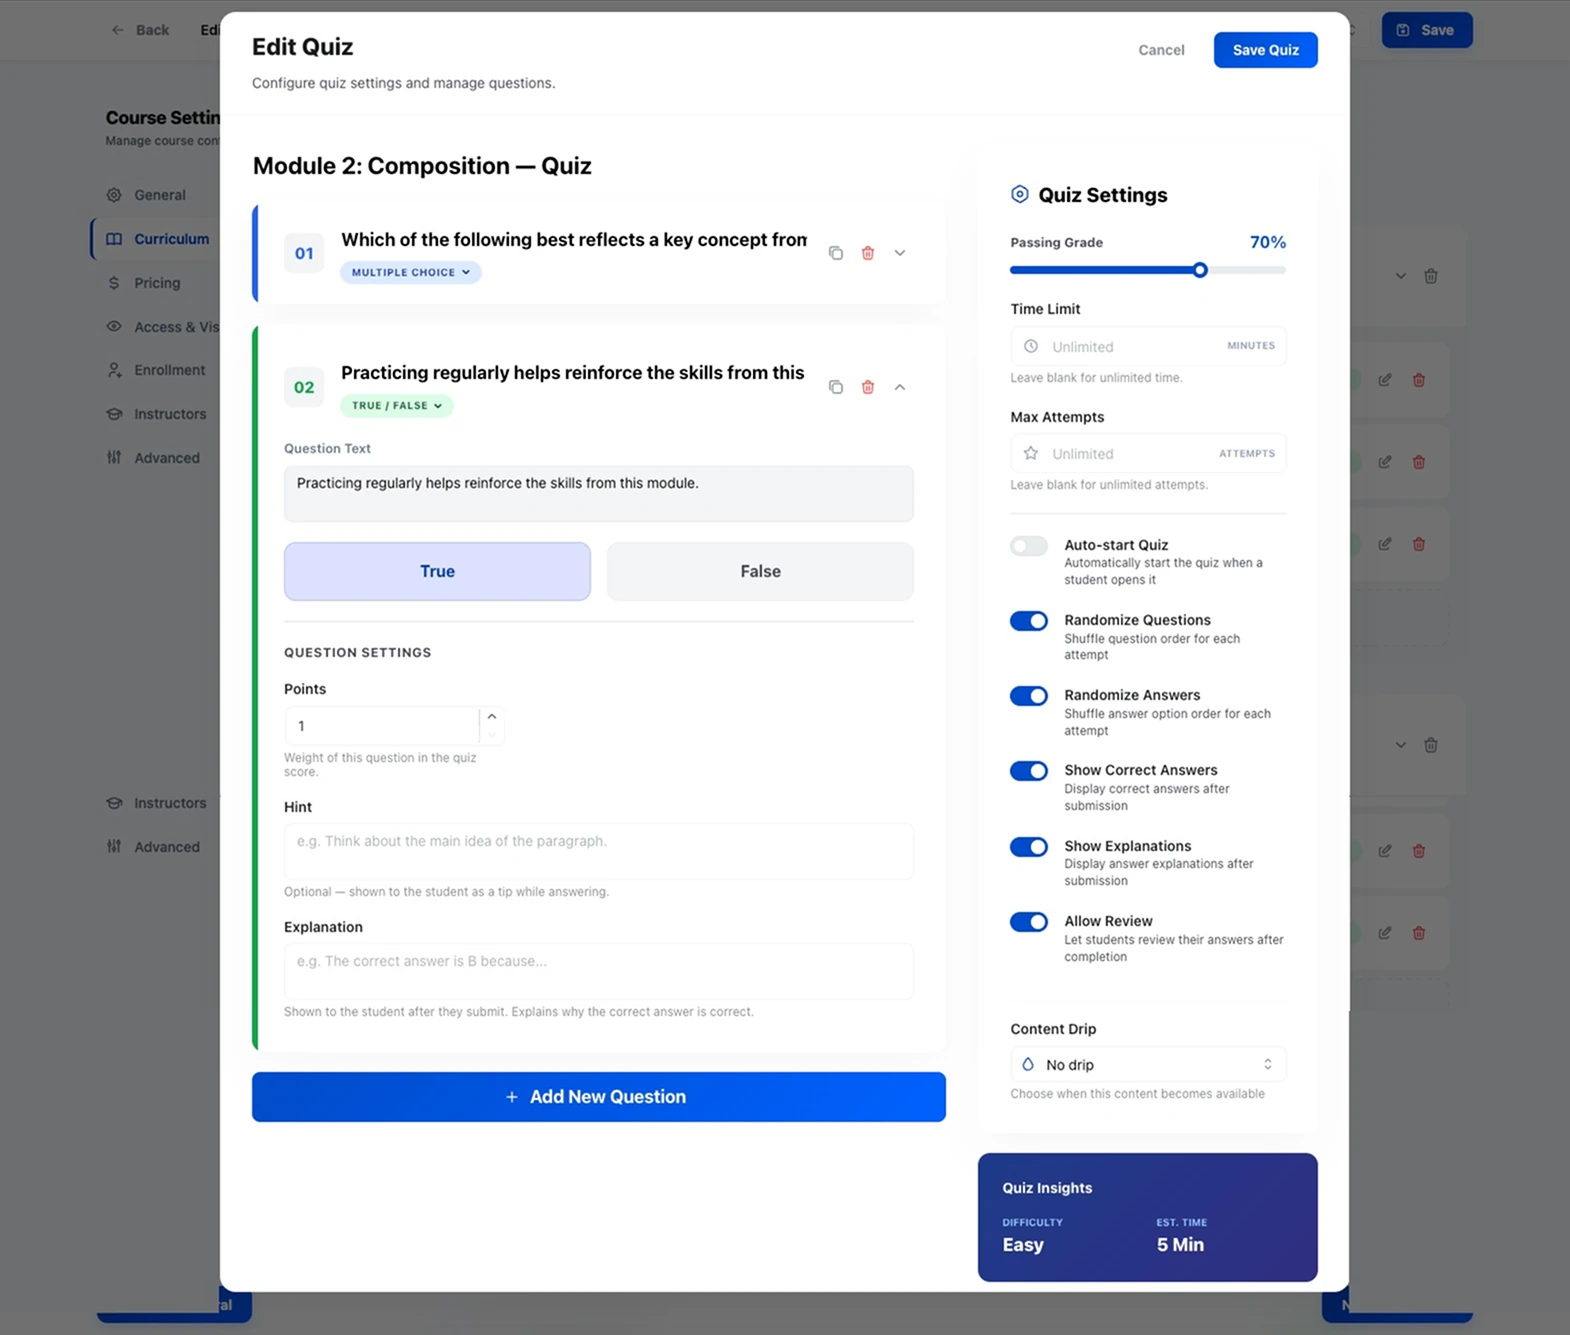
In the Quiz Builder:
- Give the quiz a title, then click Add Question to Quiz.
- Pick a type from the question-type menu — Multiple Choice, Single Choice, True / False, Fill in the Blank, Short Answer, Matching, Ordering, or Essay. (Short Answer and Essay are marked “Manual grading required”.)
- Enter the question text, answers, and per-question Points, Hint, and Explanation.
- In Quiz Settings set Passing Grade (50% by default), Time Limit (blank = unlimited), and Max Attempts (blank = unlimited), plus toggles like Randomize Questions and Show Correct Answers.
- Click Publish Quiz.
See Quizzes & grading for the grading workflow.
6. Set pricing
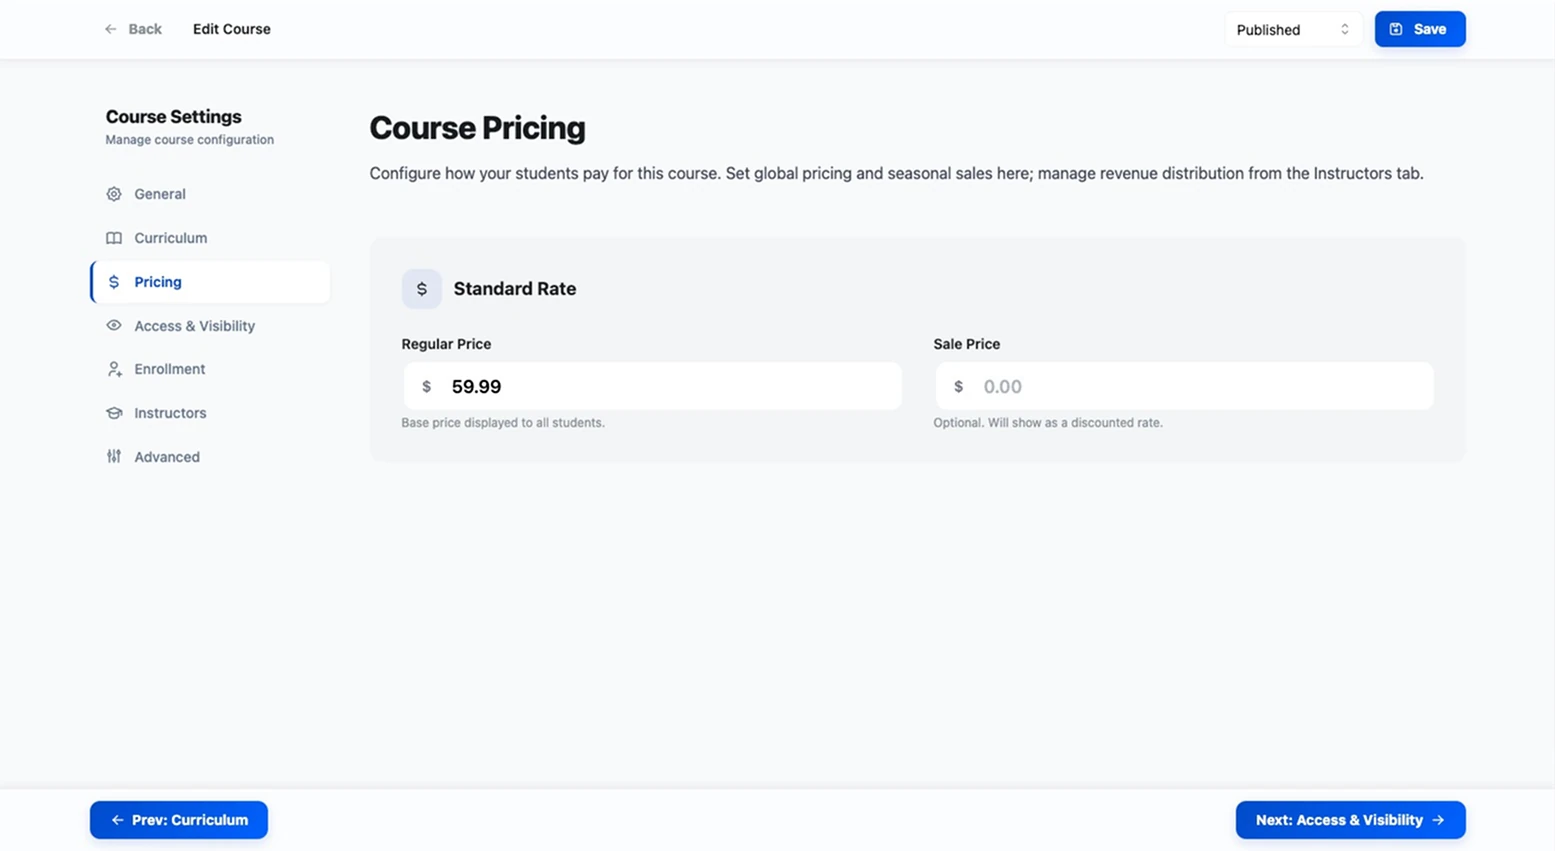
On the Pricing tab:
- Regular Price — the base price shown to students
- Sale Price — optional; must be lower than the regular price
A price of 0 makes the course free. Payment gateways are configured globally, not per course — see Payment gateways.
7. Access, enrollment, and extras
- Access & Visibility — set visibility (Public, Private, or Password protected, which reveals an Access Password field), scheduling dates, and per-course toggles for Course Reviews, Q&A / Discussions, and Sequential Learning. With the Pro Certificates addon active, choose a Certificate Design here.
- Enrollment — Maximum Students (0 = unlimited) and a Featured Course toggle.
- Instructors — assign Course Instructors and set Revenue Splits.
- Advanced — What You’ll Learn, Target Audience, Requirements, and Downloadable Resources.
8. Publish
Set the top-bar status select to Published and click Save. The course appears on your Courses page. (New courses default to Published, so a first Save may publish it right away — switch to Draft first if you’re not ready.)